In this article we will see the steps to configure ISP Failover.
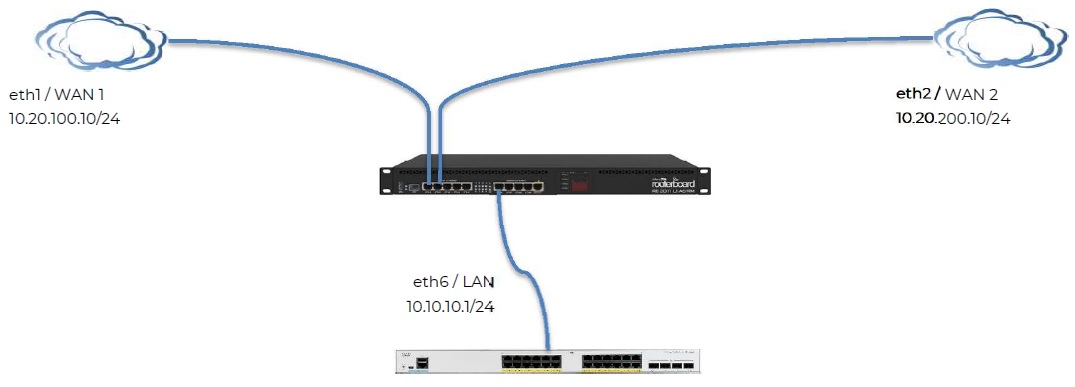
WAN 1 – 10.20.100.10/24
WAN 2 – 10.20.200.10/24
LAN – 10.10.10.1/24
Primary ISP Configuration
Step 1:- Assigning WAN – 1 IP addresses.
✦ Click on IP -> Addresses -> click on Add sign -> and enter IP Address details
Address:- 10.20.100.10/24
Network:- No need to do any changes.
Interface:- eth1
✦ Click on Apply and Ok.
Step 2:- Gateway configuration.
✦ Click on IP -> Routes -> click on Add sign -> Enter Gateway -> Check Gateway:- Select ping from Drop Down list -> Distance:- 1 and Click Apply and Ok.
✦ Note:- For Primary ISP Distance should be 1 and for Secondary ISP Distance should be 2.
Step 3:- DNS Configuration.
✦ Click on IP -> DNS -> Static Tab -> click on Add sign -> Enter Name (Like DNS1) -> in Address column Add DNS Address and Click on Apply & Ok.
✦ Same way Add Secondary DNS Address.
Step 4:- NAT Configuration.
✦ Click on IP -> Firewall
✦ Click on NAT Tab -> In General Tab Chain:- Select srcnat from Drop Down List -> Out. Interface:- Select eth1 from Drop down List -> then Click on Action Tab -> Select Action as masquerade from drop down list -> Click on Apply and Ok.
Backup ISP Configuration
Step 1:- Assigning WAN – 2 IP addresses.
✦ Click on IP -> Addresses -> click on Add sign -> and enter IP Address details
Address:- 10.20.200.10/24
Network:- No need to do any changes.
Interface:- eth2
✦ Click on Apply and Ok.
Step 2:- Gateway configuration.
✦ Click on IP -> Routes -> click on Add sign -> Enter Gateway -> Check Gateway:- Select ping from Drop Down list -> Distance:- 2 and Click Apply and Ok.
✦ Note:- For Primary ISP Distance should be 1 and for Secondary ISP Distance should be 2.
Step 3:- DNS Configuration.
✦ Click on IP -> DNS -> Static Tab -> click on Add sign -> Enter Name (Like DNS1) -> in Address column Add DNS Address and Click on Apply & Ok.
✦ Same way Add Secondary DNS Address.
Step 4:- NAT Configuration.
✦ Click on IP -> Firewall
✦ Click on NAT Tab -> In General Tab Chain:- Select srcnat from Drop Down List -> Out. Interface:- Select eth2 from Drop down List -> then Click on Action Tab -> Select Action as masquerade from drop down list -> Click on Apply and Ok.
LAN Configuration
Step 1:- Assigning LAN IP addresses.
✦ Click on IP -> Addresses -> click on Add sign -> and enter IP Address details
Address:- 10.10.10.1/24
Network:- No need to do any changes.
Interface:- eth3
✦ Click on Apply and Ok.
Step 2:- Configure DHCP Server.
✦ Click on IP -> DHCP Server -> Click on DHCP Setup -> Select DHCP Server Interface from drop down List in our scenario its eth3 and click next-> Add DHCP Address Space as 10.10.10.1/24 and click next-> Gateway for DHCP Network keep default and click next -> DHCP Relay keep default and click next -> Add the DHCP Rang in Address to give out and click next -> Add DNS Server and click next -> Edit lease time is Required and click next.
Testing the Configuration.
To check if Internet is Working on MikroTik follow below steps
✦ Click on Tools -> Ping -> Add any globle IP Address like 8.8.8.8 or 4.2.2.2 or any other web server IP Address and Click start.
✦ Check if getting reply.