In this article i will show you how to do the Basic MikroTik Configuration using Winbox Application & CLI. MikroTik router basic configuration can be divided into 10 steps.
 Step 1:- Login to MikroTik RouterOS.
Step 2:- Remove all the Default Configuration.
Step 3:- Re-Login to MikroTik RouterOS using MAC ID.
Step 4:- Assigning WAN IP addresses.
Step 5:- Gateway configuration.
Step 6:- DNS Configuration.
Step 7:- NAT Configuration.
Step 8:- Assigning LAN IP addresses.
Step 9:- Configure DHCP Server.
Step 10:- Testing the Configuration
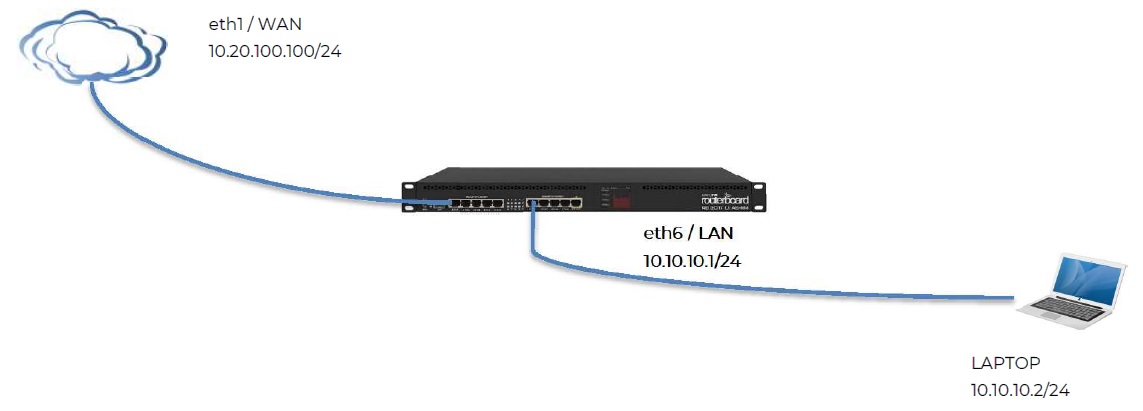
I am using below information where i have connected ISP on eth1 Port & Laptop to MikroTik eth6 Port.
1. MikroTik RouterBoard RB3011
2. WAN IP Address: 10.20.100.100/24 (ISP provided)
3. Gateway: 10.20.100.1 (ISP provided)
4. Public DNS: 8.8.8.8 and 8.8.4.4
5. LAN IP Network: 10.10.10.1/24 (Private IP block chosen by me).
MikroTik Configuration Via Winbox
Step 1:- Login to MikroTik RouterOS.
Follow my previous Blog “How to Login to MikroTik RouterOS from LAN Side” to login to MikroTik RouterOS using Winbox.
Step 2:- Remove all the Default Configuration.
It is a best practice to Remove all the default RouterOS Configuration before starting the New Configuration so follow below steps to remove default configuration
✦ Once you login to Mikrotik RouterOS goto System-> Reset Configuration-> Click on Reset Configuration-> you will get a prompt “Do you want to reset all your configuration and reboot?”-> click Yes-> Now RouterBoard will reboot.
✦ Once you relogin to Mikrotik RouterOS you will get “RouterOS Default Configuration” prompt-> click on Remove Configuration-> Now RouterBoard will again Reboot.
✦ Now all the Default configuration will be removed.
Step 3:- Re-Login to MikroTik RouterOS using MAC ID.
Since all the default configuration are removed from MikroTik RouterOS you will not be able to login with IP Address hence you need to use MAC Address to login. Follow my previous Blog “How to Login to MikroTik RouterOS from LAN Side” to login to MikroTik RouterOS using MAC Address via Neighbor discovery Tab.
Step 4:- Assigning WAN IP addresses.
✦ Click on IP -> Addresses -> click on Add sign -> and enter IP Address details
Address:- 10.20.100.100/24
Network:- No need to do any changes.
Interface:- eth1
✦ Click on Apply and Ok.
Step 5:- Gateway configuration.
✦ Click on IP -> Routes -> click on Add sign -> Enter Gateway: 10.20.100.1 -> Apply and Ok.
Step 6:- DNS Configuration.
✦ Click on IP -> DNS -> Static Tab -> click on Add sign -> Enter Name (Like DNS1) -> in Address column Add DNS Address and Click on Apply & Ok.
✦ Same way Add Secondary DNS Address.
Step 7:- NAT Configuration.
✦ Click on IP -> Firewall
✦ Click on NAT Tab -> In General Tab add Src. Address:- 10.10.10.0/24 -> then Click on Action Tab -> Select Action as masquerade from drop down list -> Click on Apply and Ok.
Step 8:- Assigning LAN IP addresses.
✦ Click on IP -> Addresses -> click on Add sign -> and enter IP Address details
Address:- 10.10.10.1/24
Network:- No need to do any changes.
Interface:- eth6
✦ Click on Apply and Ok.
Step 9:- Configure DHCP Server.
✦ Click on IP -> DHCP Server -> Click on DHCP Setup -> Select DHCP Server Interface from drop down List in our scenario its eth6 and click next-> Add DHCP Address Space as 10.10.10.1/24 and click next-> Gateway for DHCP Network keep default and click next -> DHCP Relay keep default and click next -> Add the DHCP Rang in Address to give out and click next -> Add DNS Server and click next -> Edit lease time is Required and click next.
Step 10:- Testing the Configuration.
To check if Internet is Working on MikroTik follow below steps
✦ Click on Tools -> Ping -> Add any global IP Address like 8.8.8.8 or 4.2.2.2 or any other web server IP Address and Click start.
✦ Check if getting reply.
MikroTik Configuration Via CLI
Step 1:- Login to MikroTik RouterOS.
Follow my previous Blog “How to Login to MikroTik RouterOS from LAN Side” to login to MikroTik RouterOS using CLI.
Step 2:- Remove all the Default Configuration.
It is a best practice to Remove all the default RouterOS Configuration before starting the New Configuration so follow below steps to remove default configuration
✦ Once you login to MikroTik RouterOS goto System-> Reset Configuration-> Click on Reset Configuration-> you will get a prompt “Do you want to reset all your configuration and reboot?”-> click Yes-> Now RouterBoard will reboot.
✦ Once you relogin to MikroTik RouterOS you will get “RouterOS Default Configuration” prompt-> click on Remove Configuration-> Now RouterBoard will again Reboot.
✦ Now all the Default configuration will be removed.
Step 3:- Re-Login to MikroTik RouterOS using MAC ID.
Since all the default configuration are removed from MikroTik RouterOS you will not be able to login with IP Address hence you need to use MAC Address to login. Follow my previous Blog “How to Login to MikroTik RouterOS from LAN Side” to login to MikroTik RouterOS using MAC Address via Neighbor discovery Tab.
Step 4:- Assigning WAN IP addresses.
In the CLI
Use the following commands:
[admin@RouterX] > /ip address add address=10.20.100.100/24 interface="ether1 " network=10.20.100.0
Step 5:- Gateway configuration.
In the CLI Use the following commands:[admin@RouterX] > /ip route add check-gateway=ping distance=1 gateway=10.20.100.1Gateway configuration of your MikroTik router has been completed. Now we will create NAT rule so that our MikroTik router can masquerade our LAN user IP to access internet.
Step 6:- DNS Configuration.
In the CLI Use the following commands:[admin@RouterX] > /ip dns set servers=8.8.8.8 [admin@RouterX] > /ip dns static add address=8.8.8.8 name=dns1 [admin@RouterX] > /ip dns static add address=4.2.2.2 name=dns2DNS configuration in your MikroTik router has been completed. Now your MikroTik router is able to resolve DNS request for the LAN user as well as itself.
Step 7:- NAT Configuration.
In the CLI Use the following commands:[admin@RouterX] > /ip firewall nat add action=masquerade chain=srcnat src-address=10.10.10.0/24NAT configuration in your MikroTik router has been completed. if you do not create this NAT rule, your LAN user cannot access internet through your router.
Step 8:- Assigning LAN IP addresses.
In the CLI Use the following commands:[admin@RouterX] > /ip address add address=10.10.10.1/24 interface="ether6 " network=10.10.10.0
Step 9:- Configure DHCP Server.
✦ Click on IP -> DHCP Server -> Click on DHCP Setup -> Select DHCP Server Interface from drop down List in our scenario its eth6 and click next-> Add DHCP Address Space as 10.10.10.1/24 and click next-> Gateway for DHCP Network keep default and click next -> DHCP Relay keep default and click next -> Add the DHCP Rang in Address to give out and click next -> Add DNS Server and click next -> Edit lease time is Required and click next.Step 10:- Testing the Configuration.
In the CLI Use the following commands:[admin@RouterX] > ping 4.2.2.2Check if getting reply.